|
Formatting
and Editing Web Pages Using SeaMonkey
Knowledge of HTML
Not Needed
Web pages are written and designed in a computer language
called HTML, which stands for HyperText Markup Language. HTML can be
difficult and intimidating for beginning users. The good news is, you
don't have to learn HTML to create useful and attractive web pages!
There are several good programs that work as WYSIWYG editors: What You
See Is What You Get. You lay out your web page, insert graphics, and
enter text on the screen, and the tool automatically generates the HTML
for you.
If you already have WYSIWYG web page editor such as Microsoft
Expression or FrontPage, or Adobe Dreamweaver or CS5, by all means you
should learn to use it. On the other hand, if you don't already have
such a tool, you can use SeaMonkey, a free, community-supported
Internet tool that resembles Firefox. You can read about it at the
SeaMonkey Project Page
and the SeaMonkey Wikipedia
article.
SeaMonkey works as a web browser, just like Internet Explorer, FireFox,
Chrome, or Safari. However, it also offers a web page editor that allows you to
create and format web pages, a capability that the other web browsers
don't offer. The best way to understand this capability is to try it
out.
To download the tool, go to the SeaMonkey Download
and Releases page. Find your computer platform (Windows, Mac, or
Linux) and the desired language (English or any of 20 other languages),
then click the download link and install the program.
Make Your First Web Page
- Start SeaMonkey by double-clicking the new SeaMonkey icon
on your desktop.
SeaMonkey is a web browser just like Internet Explorer or Firefox. You
can see the usual command buttons for Back, Forward, and Reload, and so
on, and the web address (URL) field.
- Using the pull-down menu, choose File > New >
Composer Page.
This opens a new SeaMonkey Composer window. This is not a browser, but
a web page editing tool. You use it to edit a web page, in the same way
that you use Microsoft Word to edit a document file. Some of the
commands and icons are similar to what you see in Word and other
editing programs.

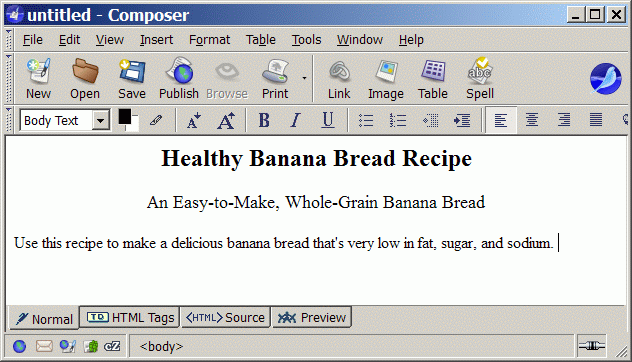
- Click inside the big white box and type the title of your
web page. Type another line, which will be the subtitle of your web
page. Then type the first few line or two of your web page content.
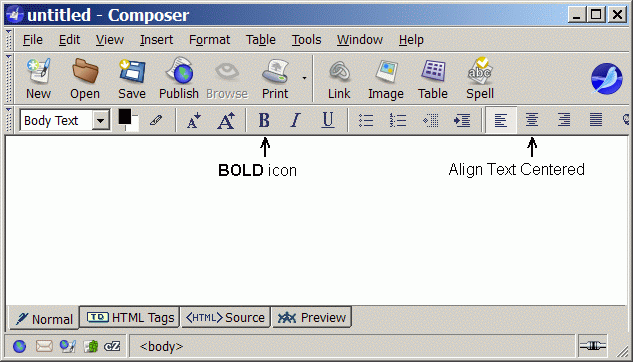
Select the first line and click the B
icon to bold the text. Then choose Format > Size > X-Large to
make the text extra large. Click the Align Text Centered icon to center
the text horizontally on the page. Similarly make the subtitle centered
horizontally on the page, and make the size Large.

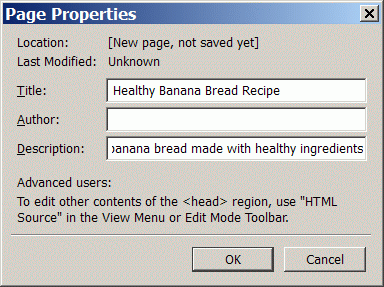
- Choose Format > Page Title and Properties. In the dialog
box, enter a Title and a Description for your web page. You can
optionally enter your name in the Author field. Click OK.

- Choose File > Save As. In the dialog box, navigate to
the folder or directory where you want to save your web page file.
Enter a file name, which should end with the extension ".html". Click
the Save button.
Congratulations! You've just created your first web page. Go to the
folder containing your new web page and open the file. The web page
appears in your default browser (Internet Explorer, Firefox, or
whatever you normally use). Note that your web page is not accessible
on the Internet yet. Only you can see it. To make it available on the
Internet, you need to publish it,
which means to copy it to a directory located on a web server. We'll get to that
later. First, you need to learn a little bit more about editing web
pages.
Learn How to Edit Web Pages
In the SeaMonkey command menu, choose Help > Help Contents. This
opens the SeaMonkey Help window. On the left side, click Creating Web
Pages and then Starting a New Page. Here you'll find detailed
instructions on creating, editing, linking, and publishing your web
pages.
Read the following SeaMonkey Help topics:
- Starting a New Page
- Formatting Your Web Pages
- Adding Tables to Your Web Page
- Adding Images to Your Web Page
- Setting Page Properties
- Creating Links
As you read about each topic, experiment with your own web page. Try
formatting the text, adding tables, adding images, setting the page
properties, and creating links. Periodically click the Save icon to
save your edited web page and the Browse icon to see how the page looks
in the SeaMonkey web browser. Try viewing the web page in your usual
browser (Internet Explorer, Firefox, Safari, ...) because it might look
slightly different. Don't be concerned about publishing yet; we'll get
to that later. (Publishing means copying your web page from your
computer to the directory on the web server.)
Adding Tables
You can add tables to your web page with the Table > Insert >
Table command. You specify the number of rows, number of columns, table
width, and border thickness. If you don't want your table to have any
lines, set the border thickness to zero.
Tables are useful for organizing the layout of your web page. For
example, at the bottom of this web page is a list of links: Intro, Web
Page Alternatives, and so on. The links are inside the cells of a
7-by-1 table (7 columns, 1 row). When you resize the web browser window
wider or narrower, the links remain neatly spaced across the page
because the table is formatted to span 90 percent of the page width.
Note that you can put one table inside another table.
If you want your main text to have left and right margins, one way to
do it is to create a 1-by-1 table and place all your content inside
that table. Format the table width as a percentage of the page width,
such as 90 percent, to get the desired amount of margin between the
text and the page edges.
Adding Images
Most web pages have some images, such as photographs or graphics. You
can insert images in JPEG, GIF, or PNG. For photos, use JPEG; for
screen captures and most types of graphics, use GIF or PNG.
You insert images with the Insert > Image command. In the Image
Properties dialog box, under the Dimensions tab, always use Actual Size
rather than Custom Size. If your image file isn't already the correct
size for your web page, edit the image first using a photo or graphics
editor, as explained in my Editing
Photos web page. This will ensure that you have photo and graphics
files of reasonable size, which will load quickly when someone views
your web page.
Creating Links
Most web pages have links (also known as hyperlinks), which are the
blue underlined words that take you to another page when you click on
them. To create a link, select the text that you want to be the link
and then click Link icon. In the Link Properties dialog box, choose the
link destination, which can be another web page, a place somewhere else
in the same web page or a different web page, an image file, or a sound
file.
When you link to another file in your local directory, in the Link
Properties dialog box, always make sure the [x] URL is Relative to Page
Location option is enabled. This ensure that after you copy your web
pages to the directory on the web server, viewers who click on a link
will look for the file on the web server, not on your hard disk. In
other words, if the option is not enabled, the links might not work
when you publish your web pages.
Editing HTML Directly
You can get the greatest power and flexibility by editing the HTML
directly. To view the HTML for your web page, click the <HTML>
Source button at the bottom of the SeaMonkey editor page. Editing HTML
is beyond the scope of this document, but good information is available
on the Internet, for example, at IronSpider Web Design Stuff.
Web Page Content and Google Ranking
Since you're planning to publish you web pages on the Internet, you
probably would like to attract as many visistors as possible to
generate sales for your business, to widely spread the information
you're offering, or to earn advertising revenue from space on your web
pages. Ideally, your web site should appear on the first page of a Google search for
words related to your website topic. In other words, you want your
website to receive a high ranking
from Google, so it is among the first websites presented in search
results.
To get a high ranking, first make sure that your page title accurately
describes your website contents and contains the keywords you expect
your viewers to search for. This is the title you set by choosing
Format > Page Title and Properties. This title appears in the title
bar at the top of the web browser when you view the web page. For
example, if your web page is an advertisement for an automobile oil
changing service, be sure that the title contains the phrase "Oil
Change" and the name of your city.
Next, make sure that your web page provides useful, relevant, and
helpful information about your topic. For example, for your oil change
advertisement page, you could write a general-interest article about
why it's important to change your oil often, how often to change it,
types and brands of oil, and so on. The more useful and relevant
information you provide, the higher the ranking you will receive.
Do not attempt to employ "tricks" that might artificially raise your
ranking. Google is wise to tricks such as repeating keywords without
purpose, setting up dummy pages with links to your site, or any similar
techniques. Instead, concentrate on providing plenty of useful, quality
information that users want to read. Include links to other highly
ranked pages that similarly provide useful, relevant information.
The process of improving your ranking with Google and other search
engines is called search
engine optimization, often abbreviated SEO. An excellent source of
information on this topic is SEO
101: How to Get Listed and Ranked Well in Google, a free website by
Michael Bluejay. You could also hire a professional SEO specialist to
work specifically on improving your website ranking. However, do not pay anyone or employ any paid SEO
service until you have read Bluejay's website. At least 90% of
what a professional SEO specialist can do for your website, you can do
yourself at no cost by following Bluejay's free advice.
|