Birdhouse construction
To install the camera inside an existing birdhouse, cut a notch for the wire to come out and attach the camera to the ceiling or an inside wall. You can also cut some windows for better lighting, as the entrance hole alone is a poor light source.For good image quality, the birdhouse should have windows that cast light toward the nest and away from the camera lens. See the following video, "Birdhouse with ceiling webcam and natural-light windows."
Window positioning and lens flare
The camera should not be able to see any of the bright outdoors through windows or the entrance hole. Otherwise, it tries to adjust the exposure for both the inside and outside, making the inside too dark. For the clearest image, position the camera to see only the inside.To prevent lens flare, add pieces of black cardboard that block exterior light from shining onto the lens, including light sources just outside of the camera's field of view. Lens flare causes a foggy, washed-out look.
Window construction
The windows should be big enough to admit plenty of light, but small enough that the birds won't fear access by predators. I built my birdhouses with windows measuring 1 by 2-1/2 inches (2.5 by 6.4 cm), not knowing whether this is an ideal size. I suggest experimenting with larger sizes than this for better light.To distribute the light more evenly and prevent predators from seeing inside, use frosted or translucent windows, such as color 2447 acrylic. You can make clear windows frosty by sanding them with fine sandpaper. Alternatively, you can put waxed paper on the inside of the window.
Instead of acrylic, you can use Plastic Corrugated Board, Item # 10567988 from Michael's Stores. It is easy to cut with a hobby knife. For extra strength, glue two layers together with super glue with the corrugated lines running perpendicular to each other.
Windows can potentially let in too much light, causing the birdhouse to get hot like a greenhouse. If the box is out in full sun, be careful to keep the interior temperature reasonable. You can monitor the temperature with a Taylor 1-inch dial (or similar) thermometer inserted through a hole drilled in the side of the box. For more information on bird box temperature control, see Sialis Beat the Heat and Cold.
If you would like to see the building plans for the birdhouse in the video, send a request to the email address at the end of this article.
Interior Camera
Although you can use a general-purpose webcam inside the birdhouse, a birdhouse camera is designed to easily fit inside and has its focus and infrared illumination optimized for close viewing.Wi-Fi vs. PoE (Power over Ethernet)
Camera makers offer both Wi-Fi and PoE (Power over Ethernet) cameras. Both types require a wired connection for power:- Wi-Fi needs a wire to an electric outlet
- PoE needs a wire to your Internet router
In a PoE connection, a single Ethernet cable carries both data and power. A type of AC adaptor called a PoE injector "injects" the power into the cable. A PoE data connection is more reliable than Wi-Fi, but you need a physical pathway for a cable between your router and the birdhouse, for example, through a garage door, open window, or attic vent.
Cameras can be powered by battery, but this requires recharging/swapping of batteries at regular intervals. A 12V motorcycle battery works for about 4 days.
Green Backyard Bird Box camera kit
The Green Backyard Bird Box Camera HD Network Cable Connection kit includes a camera, a PoE injector, and a 60-foot (20 m) Ethernet cable. You can buy a longer cable if needed, up to 300 ft (100 m). After you wire the camera, install the associated software applications:- Golbong VMS camera app for Windows or Mac
- Green Backyard camera app for Android/iOS smartphone
The following video introduces camera usage and video capture.
Note: The video demonstration uses the slightly older CMS5 app, similar to the current VMS app. Some commands have changed but basic operation is the same.
Video data formats
The software tools generate video data files in various formats. You can view videos in most formats using the free, open-source VLC media player. The tool also allows you to read in a video and write it out in a different format.The HandBrake video transcoder is a free, open-source tool designed specifically to convert videos from one format to another, and to perform various changes. For example, you can resize a video to a different resolution for web publishing or convert just a specified time segment of a clip. I used HandBrake to make the video at the top of this web page.
These are the video formats produced by the camera tools:
- VMS monitor "Record" button (camera icon above live view) -- This button saves the video in .avi format in the directory C:\Records\Local Records\camera_name. You can view .avi files in VLC.
- VMS > Remote Playback > select camera > Search > select clip > Download -- This downloads a motion-triggered video clip stored in the camera's SD memory card and saves the file in .h265x format, by default in directory C:\Program Files (x86) > VMS > data > users > admin > downloads. To specify a different storage directory, use VMS > System Config > Path Config > Download Path. The .h265x format cannot be viewed in media players. To convert it, use the Golbong H265 to MP4 converter.
- Green Backyard smartphone app's monitor camcorder button -- After you record a clip, tap the popup to specify what you want to do with it, such as email it or save to file. The clip file is transmitted or stored in .mp4 format.
- OBS Studio "Start Recording" button -- The video files are saved to a directory specified by Settings > Output > Recording > Recording Path. OBS writes out the videos in .mkv format, which you can view in VLC. To convert to .mp4 for other video tools, use HandBrake.
Exterior camera
You can optionally use a second camera to see the outside of the birdhouse. You can watch the birds entering and leaving the box, and see interlopers or predators that trigger defensive behaviors inside the box. You can choose from a variety of webcams and security cameras, any of which can serve well.To prevent lens flare, make a lens hood or shade to block direct sunlight from shining directly into the lens.
To live-stream or record the exterior and interior views together in one frame, combine them in OBS Studio. Webcams typically have a wide-angle view, which you can crop in OBS.
Live-streaming on YouTube
To live-stream your camera views on YouTube, do the following:- Install and configure OBS Studio
- Set quality-vs-data options
- Create a YouTube account
- Start live streaming
- Set the live stream URL
Install and configure OBS Studio
OBS Studio is a free, open-source tool for video live streaming and recording. You specify the video input sources and how to display them in a workspace. You can crop and resize each video source and control its position in the workspace, and individually control the audio from each source.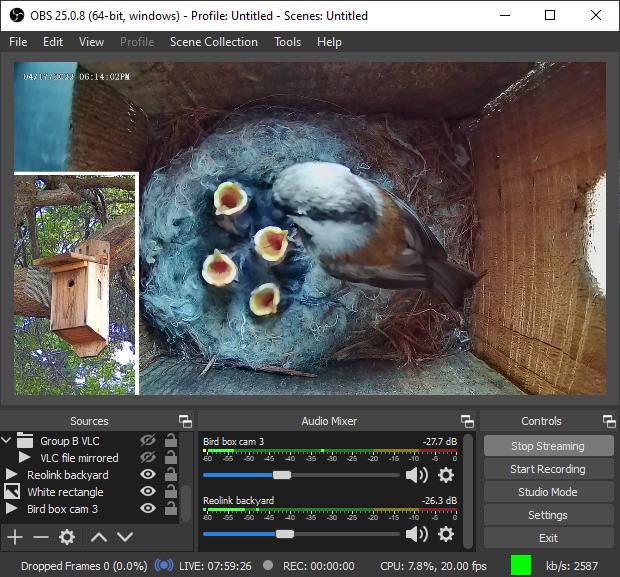
To prepare OBS Studio for streaming:
- Download, install, and open the OBS Studio tool.
- Click the Settings button, then the Video icon. Set both of the resolution fields to 1280x720, then click OK.
- At the bottom of the Sources box, click the "+" icon and choose Media Source.
- Under "Create New," enter a name for your source, like "Bird box cam 3", then click OK.
- In the Properties for "Bird box cam 3" dialog box, uncheck [ ] Local File.
- In the Input field, enter the Real Time Streaming Protocol (RTSP) string for your camera (see below), then click OK. The live video should appear in the workspace.
- Resize and move the video frame as needed to fill the desired part of the workspace.
rtsp://camera_ip_address:554
/user=user_name
&password=your_pswrd
&channel=1
&stream=0.sdp?real_stream
Example (should be all in one line, no spaces):
rtsp://192.168.1.79:554

   /user=jane&password=sordfish

   &channel=1&stream=0.sdp?real_stream
To find out your Green Backyard camera IP address (IP domain), user name, and password, open VMS, click Device Manager, then click the pencil icon in the Operation column.
rtsp://user_name:your_pswrd
@camera_ip_address:554
//h264Preview_01_main
Example (should be all in one line, no spaces):
rtsp://jane:gulltung

   @192.168.1.63:554

   //h264Preview_01_main
To find out your Reolink camera IP address, user name, and password, open the Reolink Windows app and click the pencil-and-paper icon next to your camera name.
Do a web search for "camera_brand_name RTSP". Some camera brands do not support RTSP, such as Blink. In those cases, you can open the camera's live viewing tool and then use Window Capture as a source in OBS.
To combine multiple sources in the workspace, repeat steps 3 through 7 for each source. Sources appearing higher in the Sources list are displayed in front of those lower in the list, like "layers" in PhotoShop.To crop a source, right-click that source in the Sources box and choose Filters. At the bottom of the dialog box, under Effect Filters, click "+" and choose Crop/Pad. Specify a name such as "Crop1" and click OK. Then enter the number of pixels to crop from each of the four sides.
To make a white border around an inset source video, first create a white rectangle image file using a "Paint" tool. In OBS, add the image file as a source (Sources > + > Image). Resize the white rectangle and place it where you want in the workspace. In the Sources list, move the rectangle to the position between the two camera sources.
Set quality-vs-data options
You can specify the data stream intensity of the source devices and OBS Studio output stream. A more data-heavy stream can produce finer, more highly detailed images and less motion-blurring, at a cost of greater data usage.For the OBS output that I live-stream on the Internet, I use a data rate of 2200 Kbps (kilobits per second). This is equivalent to 1 GB (gigabyte) per hour, similar to streaming movies on Netflix. Continuous 24/7 live-streaming at this rate uses 720 GB per month. Internet service providers often impose a monthly data cap of around 1,000 GB (1 Terabyte).
You can use the following settings as a starting point to determine the optimum configuration for your cameras, computer, and Internet service level.
Green Backyard camera settings:
VMS Live View > right-click camera name > choose Remote Config > Encode Config
Compression: H.265X
Resolution: 720P
Quality: Good
FPS: 20
Stream Control: VBR
BitRate(Kb/s): [greyed out]
I Frame Interval: 2
Video/Audio: [x] [x]
Static Encode Config: main profile
Smart Encode: Stop
Reolink Windows tool > camera's gear icon > Camera - Stream
Clear
Resolution: 2560*1920
Frame Rate (FPS): 20
Max Bitrate (Kpbs): 2048
Fluent
Resolution: 640*480
Frame Rate (FPS): 7
Max Bitrate (Kpbs): 160
OBS > Settings > Output > Streaming
Video Bitrate 2200 Kbps
Encoder: Hardware (your_computer's_encoder)
Audio Bitrate: 128
[ ] Enable Advanced Encoder Settings
Create a YouTube account
- If you don't already have a gmail account, create one at gmail.com.
- Go to YouTube Studio (studio.youtube.com) and log in.
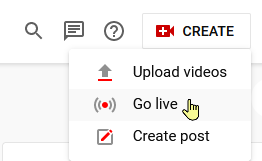
- At the top, click the Create button and choose Go Live.
Start live streaming
To prepare YouTube Studio (studio.youtube.com) to accept live streaming:- Click the Create button and choose Go Live.
- Choose Right Now and Streaming Software.
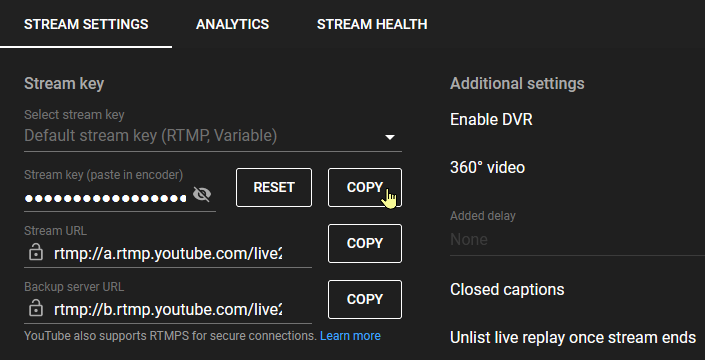
- Set the Create Stream options as you want.
- To the right of the Stream Key field, click the Copy button.
In OBS Studio, to start live streaming:
- Open OBS Studio. It should display your video sources.
- At the bottom right, click the Settings button.
- In the Settings dialog box, click the Stream tab.
- Paste the key into the Stream Key field (click, Ctrl-v), then OK.
- Click the Start Streaming button. You should see streaming start in YouTube Studio.
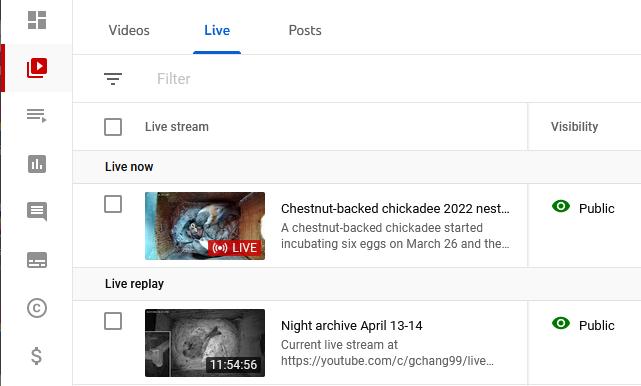
- Under a separate browser tab, open YouTube Studio.
- On the left, click the Content (YouTube play) button.
- At the top, click Live.
YouTube and OBS remember all your settings. The next time you want to live-stream, simply open the YouTube Studio live-streaming page and OBS, then click Start Streaming in OBS.
Set the live stream URL
With your live stream visibility set to Public, anyone can watch it using any of the following URLs: https://www.youtube.com/channel/your_channel_name/live
https://www.youtube.com/c/custom_URL_name/live
https://www.youtube.com/@your_handle/live
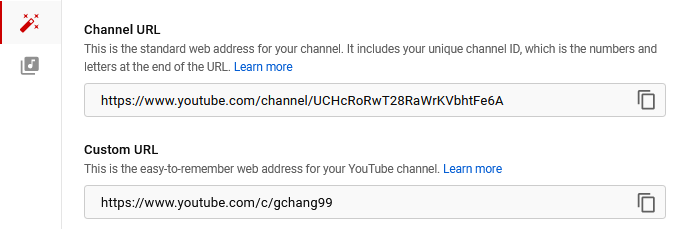
To find out your_channel_name, go to YouTube Studio and click the magic wand (Customization) icon on the left, then Basic Info at the top. Under Channel URL, the long gobbledygook string is your channel name. Below that, you can create a short Custom URL for your channel.

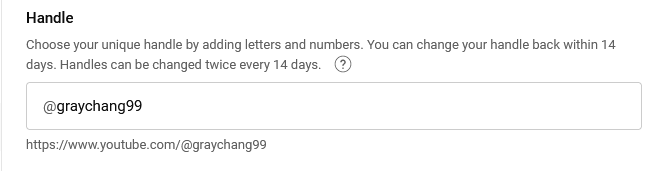
The Customization page also lets you choose a handle.
End live streaming
To end live streaming:- In OBS, click the Stop Streaming button.
- In the YouTube Studio live page, click END STREAM.
- In the dialog box, click END to confirm.
- YouTube asks if you want to edit the video. Always choose DISMISS.
If you want to edit the archive video (for example, Title or Description), restart the live stream first. Otherwise, you edit your future live stream as well as the archive.
There is a limit of 12 hours for each saved archive, so if you want to keep a continuous archive covering a days-long stream, you need to stop and restart the stream once every 12 hours as described above, "End live streaming."
Troubleshooting
I've encountered the following issues in the past.The camera goes offline and doesn't reconnect
To check the camera status, open VMS, click Device Manager, and look in the Connect column. Sometimes the camera reconnects by itself. If not, you might recover by powering down the camera. Disconnect and then reconnect the Ethernet cable between the PoE injector and the camera.The Ethernet connection at the camera is prone to corrosion due to exposure to moisture (rain, fog, dew) with voltage differences between connector pins. Disconnecting and reconnecting the cable might dislodge enough corrosion to re-establish the connection.
If not, disconnect the cable from the PoE injector, disconnect the cable plug from the camera's socket, and examine the metal pins of both the plug and socket. Remove any visible corrosion by scraping the metal pins with a pointed tool or fine sandpaper. Blow away the dust, then put everything back together and see if if works.
Camera won't record to SD card
You only need to install an SD card into the camera if you want to have the camera automatically record video clips when motion is detected in the camera view. This is explained in my instructional video, Capturing Video from the Green-Backyard Bird Box Camera.In the VMS app on your computer, in Live View mode, right-click the camera name, choose Remote Config, click Smart Alert, and under Motion Detect, make sure the Record box is checked. Also check the Sensitivity and Region settings, and the Record Config settings.
If recording still doesn't work, open the Green Backyard app on phone, open camera page, tap gear icon, tap Smart Alarm, and make sure Human Detection is set to OFF. (As there are no tiny human shapes in the nesting box, all motion is ignored in that mode.)
Live-streamed video and audio out of sync
When you start streaming, the video and audio are wonderfully synchronized. However, after a while, you hear something first and then see the action, with a delay of 1 or 2 seconds or more.The video data steam takes longer for OBS to process than the audio stream. After a while, the video lags behind the audio due to the backlog of video data.
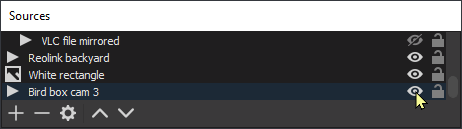
To fix it, stop and restart the lagging input source. In the Sources list, click the "eye" icon to shut off the input stream, wait 2 seconds, and click it again to restart the stream. This clears out the data queue and restarts the video/audio stream, freshly synchronized.
So that you don't have to go running back to your computer every 15 minutes to click the "eye" icon, you can automate the process using the AutoHotKey application for Windows. First do the following in OBS:
- OBS Settings > Hotkeys
- Scroll down and find your input stream.
- Click in the Stop field and type Ctrl-Shift-F4
- Click in the Restart field and type Ctrl-Shift-F5
- Click OK.
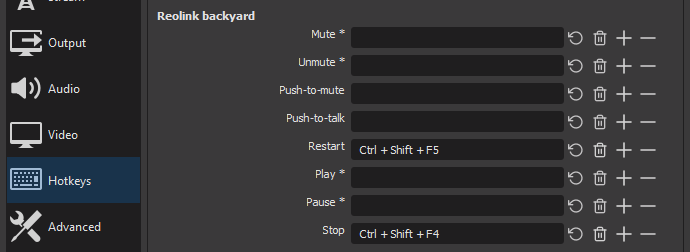
Now you can use the keyboard shortcuts Ctrl-Shift-F4 and Ctrl-Shift-F5 to stop and restart the input stream. If you have multiple inputs, you can do the same for each one using a different key sequence, such as Ctrl-Shift-F6 and Ctrl-Shift-F7.
To install and configure AutoHotKey:
- Download and install the AutoHotKey application, version v1.1.
- In a blank area of the desktop, right-click and choose New > AutoHotKey Script.
- A new AutoHotKey ".ahk" icon appears on your desktop. Change its name to ResetOBS.ahk
- Right-click the icon and choose Edit Script. The script is opened in Notepad.
- Open the text file ResetOBS.txt.
- Copy the whole block of text in the ResetOBS.txt file, then paste the text into the Notepad editor below the existing few lines of the script.
- Read the script so you can understand it. You might want to edit the numbers in the "SetTimer" and "Click" instructions.
- In Notepad, execute File > Save, then File > Exit.

To stop the script from running, go to the green "H" icon in the system tray, right-click it, and choose Exit.

Recent Updates
The birdhouse construction video recommends epoxy glue to install the skylight windows. I have since then found that epoxy resin is too brittle, resulting in cracks around the window as the wood expands and contracts with changes in humidity. Instead, use clear outdoor caulking. Allow a 1/8-inch (3 mm) gap between the acrylic window edge and the wood, and fill the gap with caulking. The flexible/stretchable caulking allows for wood expansion while keeping the gap sealed.I found an inexpensive and easy-to-use window material at Michael's Stores, Plastic Corrugated Board, Item # 10567988. You can cut it with a hobby knife. It's not as strong as acrylic, so for extra strength, glue two layers together with super glue with the corrugated lines running perpendicular to each other.
I encourage experimenting with larger windows to provide more light, such as 1.5 or maybe even 2 inches wide, instead of just 1 inch -- let me know if the birds take up residence.
For more information
Nestwatch, the Cornell Lab of Ornithology, Installing a Nest Box CameraGreen Backyard Tips for Bird Box Camera Installation
© 2022, 2023 Gray Chang
Comments? Questions? SFBayNestCam [at] gmail [dot] com