Build a Cardboard Camera Obscura

Step-by-Step Instructions
With Pictures
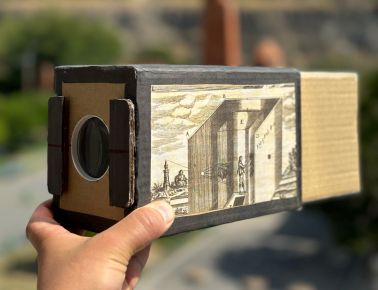
The camera obscura has been used as a tool by artists for hundreds of years. You can build one using a magnifying glass, cardboard, a paper bag, tape, and glue. The image is projected upside-down on tracing paper. It works like a live movie projector! (It does not record the image.)


In the old days, artists would trace the scene projected onto a sheet of paper. In modern photographic cameras, the image is captured by light-sensitive film or an electronic light sensor.
Materials and Tools Needed
Mark the Cardboard
Cut the Cardboard
Fold the Cardboard and Glue the Joints
Mount the Lens
Use the Camera
Camera Design Alternatives
Email me a photo of your completed camera obscura, and I'll post it on this web page. My email is: DogDazeNow [at] gmail [dot] com
Materials and Tools Needed
- 1 magnifying lens
- 1 sheet of cardboard 18 by 19 inches, 1/8 inch thick (46 by 49 cm, 3 mm)
- 1 brown paper bag
- 1 small sheet of tracing paper, waxed paper, or vellum paper
- White glue or wood glue
- Scotch tape or packaging tape
- Hobby knife
- Scissors
Lens, Hobby Knife, and Paper Vellum
The following plan shows how to measure and cut the cardboard for a lens with a 4-inch (100-mm) focal length and 1.5-inch (38-mm) diameter, and a cardboard thickness of 1/8 inch (3 mm). Diagram dimensions are inches. See the link below for metric units.
Lens
You can use a magnifying glass purchased from a stationery store or dollar store. A lens with a larger diameter produces a brighter image. A lens with a longer focal length (a weaker magnifier) produces a larger image.
To determine the focal length of a lens, hold it up toward a bright, distant scene and focus the image onto a sheet of white paper or the palm of your hand. When the image of the scene comes into sharp focus, the distance from the lens to the paper is the focal length.
The plans are intended for a lens with a 4-inch (100-mm) focal length, but will also work for any focal length from 1 to 5 inches (3 to 13 cm). For longer focal lengths, modify the plans to make a bigger box.
Cardboard
The cardboard should be a single sheet measuring at least 19 by 18 inches (48 by 45 cm). You can find large corrugated cardboard boxes behind big-box stores. If you shop at a warehouse store like Costco, you can often find large cardboard sheets in the aisles, used for separating layers of stacked products. Look for sheets that are smooth and even, with a thickness of about 1/8 inch (3 mm).
Glue, Brown Paper Bag, and Tape
Any white glue or wood glue is fine for this project, such as Elmer's, Titebond, or Gorilla. Avoid using washable "school glue" because the camera might fall apart if it gets wet.
To reinforce the cardboard joints, you will glue paper strips cut from a brown paper bag from a grocery store like Trader Joe's. Any paper of a similar thickness and strength will also work.
You can use either Scotch tape or packaging tape to attach the tracing paper to the cardboard.
Tracing, Waxed, or Vellum paper
The camera focuses the image onto a translucent sheet, which you view from behind, like a rear projection screen. You can use tracing paper from an art supply store, or waxed paper from a grocery store. Vellum paper used by artists works well. Photographic ground glass works the best, but it's hard to find, and it's expensive and breakable.
Hobby Knife and Scissors
A sharp, pointed hobby knife such as X-Acto or similar brand is good for making clean, straight cuts through the cardboard. To make folded joints, you'll make some cuts only partway through the cardboard.
Mark the Cardboard
Place the cardboard on a table in front of you with the long corrugated pleats, the "grain" direction, running horizontally (left-right). The pleats are visible as faint lines on the cardboard surface. The cardboard is very resistant to folding perpendicular to the grain, but weak parallel to the grain, like the grain of wood.
Mark and cut long straight edges along the bottom and left sides if your your cardboard sheet doesn't already have them, using the techniques described in the "Cut the Cardboard" section below. Make sure these edges are exactly perpendicular by lining up a rectangular sheet of paper. The bottom edge should be exactly parallel with the "grain" direction of the cardboard.
Starting from the lower-left corner, measure and mark the circled cross-hair points shown in the diagram. Then join them with pencil lines using a straightedge such as a yardstick. Draw both the solid and dashed lines shown in the diagram.
To mark the lens hole, draw diagonal lines in the 4-by-5 inch (10-by-12.5 cm) section. Center the lens over the intersection point and carefully draw a circle around the lens. Alternatively, you can use a compass set to one-half the lens diameter and draw an exact circle centered on the intersection point. Check to make sure that the circle exactly matches the lens edge.
Cut the Cardboard
Safety Warning: Use the hobby knife in a manner that prevents poking or cutting yourself or others nearby, even if the knife slips. Closely supervise children, or do the cutting for them. To tighten the blade holder, first attach the plastic blade cover, then twist.Cut the cardboard freehand, using multiple strokes along the pencil line. For the first stroke, cut through just the first layer of paper, carefully following the pencil line. This shallow cut serves as a guide for the remaining strokes. Repeat cutting strokes until you reach the desired depth for folding (dashed lines in the diagram) or all the way through (solid lines in the diagram).
The proper cut depth for a folded joint depends on where the cut falls on the undulating pleats inside the cardboard:
- Above a trough, make a shallow cut through just the single outer layer of paper:

- On a crest, cut through two layers of paper, through the top of the crest:

- Between a trough and a crest, cut through the surface and also through a sloping pleat inside the cardboard. Be sure to keep the cut straight.

- For a cut perpendicular to the long pleats, cut about 3/4 of the full thickness of the cardboard:
When cutting the circular hole for the lens, try to make an exact match to the lens size -- cut just inside of the pencil line. For a smooth and round hole, cut bit by bit using just the tip of the knife.
Mount the Lens
If the hole cut for the lens is exactly the right size, you can push the lens into the hole, and friction will hold it there. If you want to make sure it doesn't fall out, add a few drops of glue along the edge.
If the hole is too small, use the knife to cut it slightly larger.
If the hole is too big, you can build it up by gluing a strip of paper inside the hole as shown below.
Fold the Cardboard and Glue the Joints
From the brown paper bag, cut long strips 1 inch (25 mm) wide. Fold each strip to make the creases shown in the following diagram.
(Metric units: 3/16 inch is about 4.5 mm)
Front Part of the Camera
Flip the lens part up and fold the four sides to surround it. Cardboard edges should meet corner-to-corner without overlap.
Join the sections together with tape on the inside of the box, so they stay together while you glue the joints on the outside of the box. You can remove this tape later.
Fold up the back part of the camera and put it inside the front part. Tape the joint temporarily. The back part helps hold the front part in place while you glue the joints. This also helps to ensure a good fit.
t
If the rear part fits a bit loosely in the front part, don't worry. It will be more snug later, after you add the joint reinforcements.
If the rear part is too big to fit into the front part, you'll need to re-make the rear part using slightly smaller dimensions. This might happen if the cardboard is a lot more than 1/8 inch thick (3 mm).
Glue all eight joints of the front box using brown paper strips 4, 5, and 8 inches long (10, 12.5, and 20 cm). For the two shorter lengths, trim off two corners as shown below.
Apply glue to the cardboard on both sides of the joint, and spread it into a thin layer.
Apply the strip of paper and slide it back and forth along the joint a couple of times to make sure the glue is spread evenly. Put your other hand inside the camera behind the joint as you press the paper strip into place.
After the glue is dry, remove the rear box and remove all the tape from the inside of the front box.
If the paper does not entirely cover the corners, glue tiny pieces of brown paper to cover the holes.
For extra strength, glue a strip of brown paper on the inside of the front box along the new edge-to-edge joint. This strip should have a single crease right down the middle. The strip should should be about 4 inches long (10 cm). Allow the glue to dry.
The three folded joints are already strong enough and don't need reinforcing strips inside.
Rear Part of the Camera
The rear part of the camera is floppy. To keep it square while you tape the joints, slide it halfway into the front box of the camera.
On the inside of the box, along the new end-to-end joint, glue a reinforcing strip of brown paper. The strip should have a single crease and cover about half the length of the box (4 inches or 10 cm), starting from the outside edge.
On the outside of the box, glue the exposed parts of the four joints, covering about half the length of the box (4 inches or 10 cm), using strips with two creases down the middle.
Allow the glue to dry.
Attach the Tracing Paper
Cut a rectangle of tracing paper (or waxed paper or vellum paper) measuring 5 by 6 inches (12 by 15 cm). Center the paper over the rear end of the camera box.
Fold the two longer sides of the tracing paper over the box and tape them to the sides of the box. Make sure that the paper is stretched flat over the back of the box.
Put a piece of tape around each corner of the box to secure the paper corners.
Using scissors, cut the four corners that extend beyond the cardboard.
Fold the other two sides of the tracing paper and tape them to the sides of the box.
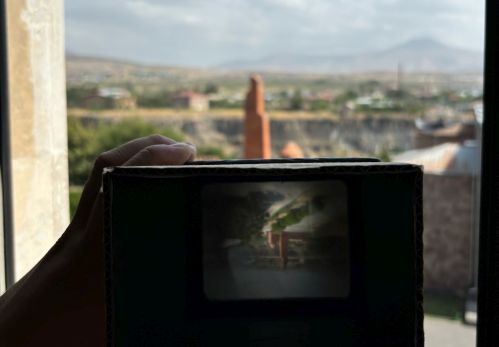
Separate the front and rear boxes of the camera. Turn the rear box around and insert it back into the front box, with the tracing paper inside, facing the lens. The camera is now operational.
To finish construction, glue brown paper strips over the remaining halves of the joints of the rear box. Also glue a reinforcing strip to the end-to-end joint on the inside.
If the fitting is very loose, build up the rear part of the camera by gluing sheets of brown paper on one or more sides of the rear box.
The two camera parts work like a piston in a cylinder, trapping air inside. To allow air to enter and escape when focusing, cut small triangular air holes in the corners of the tracing paper.
Optional: Paint or decorate your camera. You can paint the cardboard directly, or cut sheets of paper and glue them on using white glue or glue stick.
Let me know how much time you spent building the camera. What parts were difficult, and which were easy? How can the instructions be improved? Email me photos of your completed camera, and I'll post a selection here.
Recent visitors:

Nur Khalisha Mohd Azizi built the camera and said "very helpful for my physics assessment in light and optics".
"My name is Hayrapet Tokhunt. I'm from Armenia. Thank you for the instructions. It's amazing. By Me and my daughter."
Professor Mary Bock from University of Texas at Austin had her students build the camera as a classroom activity. She says that using black foam board instead of cardboard works well. Foam board has no corrugation, so you can easily cut it anywhere in any direction.
Using the Camera
Push and pull the back part of the camera to adjust the focus.
Warning: A sharply focused image of the Sun can burn the tracing paper and set the camera on fire.The image is upside-down. To see the image right-side-up, do the following.
Alternatively, build the camera with an inverting mirror.
Camera Design Alternatives
Here are some other ways to build and use the camera.
Camera Size
You can modify the dimensions to make a bigger or smaller camera. Make sure that the front box is long enough to contain the focal plane and hold the rear box, and make the rear box long enough to reach the focal plane. The focal plane is the place where distant objects are in sharp focus.
For cardboard with a thickness of 1/8 inch (3 mm), the rear box must sections must shorter by 1/4 inch (6 mm) so that they can fit between the folded front box sections on two sides. Modify the plans accordingly for other cardboard thicknesses.
Lens Hood
The following camera obscura has a "lens hood" that provides shade over the lens, preventing stray sunlight from entering the lens from above. This was the plan I used for the workshop I led at the 2019 Maker Faire Bay Area.
The following plan shows how to make this model.
To ensure that the front of the camera is exactly perpendicular to the camera bottom, cut the alignment slit shown in the plan, and glue a small rectangle of cardboard inside the box just behind the slit. When you flip up the lens holder part of the box, the top edge meets the edge of the small rectangle.
Projection on White Screen
The term "camera obscura" comes from the Latin, meaning "dark room." The traditional camera obscura is a darkened room that projects an image on a wall. The viewer sits inside the room and views the inverted image, and can trace it with art materials to draw an accurate rendition of the scene.
Athanasius Kircher, Large portable camera obscura, 1646
© Gernsheim Collection
You can make your small camera obscura work in a similar way by using an opaque white sheet of paper instead of tracing paper. To view the image, you need to cut an extra hole in the front of the camera, and put your eye right up to the hole to see the image. It's somewhat awkward because your head tends to block the view.
Right-Side-Up Image
To display an image right-side-up instead of upside-down, put a mirror inside the box at a 45-degree angle. This flips the image to vertical but makes it backward (reversed left to right). You look down, rather than forward, to view the image, similar to a twin lens reflex camera.
In the following design, the lens is on the side of the box instead of the end, and the mirror reflects the image up to the tracing paper.
Waterhouse Aperture Control (Optional)
You can experiment with different apertures (lens openings). A smaller opening results in improved sharpness by reducing spherical aberration and increasing the depth of field, at the cost of a dimmer image. Here are the additonal construction steps to make a set of push-through ("Waterhouse" type) aperture holes:
Here are the steps in detail:
- Open the parts template SVG file and print it out at full size (100%). Print in landscape mode to fit the full length (8.13 inches or 20.6 cm).
Print the template on index card stock if you can. Otherwise, print on plain paper and glue the paper onto index card stock or a sheet of thin cardboard, like a cereal box.
- Cut apart the 4 plain strips (yellow and blue if you printed in color), and the big strip with the holes. Carefully cut out the holes. The smallest hole (6.25 mm) is the same size as a standard 1/4 inch hole punch.
- Draw horizontal and vertical cross-hair lines on the front of the camera, centered on the lens.
- Glue the two narrow (yellow) strips in the position shown below, 2 inches (51 mm) apart. The big strip with holes should just fit between these narrow strips.
- Glue the two wider (blue) strips in the position shown below. Apply glue only where the wider strip overlaps the narrow strip.
After the glue is dry, slide in the strip with the holes. To align a hole with the center of the lens, match the dashed line with the arrows.
The sliding strip shows the hole diameters and f-numbers. The f-numbers are the focal length, 100 mm, divided by the hole diameter. Each successive hole allows half as much light to enter as the previous hole.
Pinhole Camera Without Lens
You can use a pinhole instead of a lens, but this makes a dim image. Use a sheet of aluminum foil with a tiny hole. For a very small hole made by the tip of a needle, the image is quite sharp but very dim. Even for a bright sunlit scene, you'll need a dark cloth or jacket over your head to shut out the extraneous light as you view the image. A tiny hole is suitable for making photographic images.
There is no need to "focus" a pinhole camera, as all focal lengths work equally well. Changing the pinhole-to-paper distance merely changes the size of the image. The sliding box makes a "zoom lens".
A bigger hole, for example made by poking a pencil tip, results in a brighter but more fuzzy image. To get a image that is both bright and sharp, you need to use an optical lens.
Photography -- Recording the Image
To turn the camera obscura into a camera for photography, you need the following:
I made a cardboard pinhole camera with these features.
- A holder for the light-sensitive film, paper, or electronic sensor
- A shutter to block the lens and control the exposure time
- Careful sealing of all cracks to prevent light leaks


 thick")


