Hand-Held Cardboard Analemma Full-Year Solar
Position Visualizer Tool
Shows shift in
Sun position across a whole year
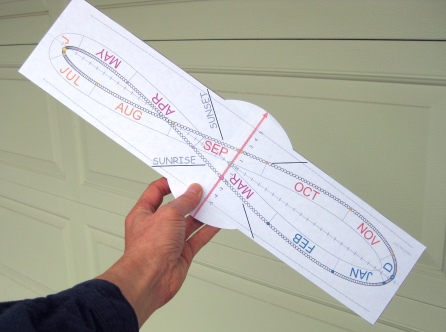
Free to Download and Print
The tool has an analemma, a 365-day calendar with a figure-8 shape, which shows the exact position of the Sun in the sky relative to the year-average solar position. To visually sweep out the Sun's path, you hold the tool at arm's length and move it across the sky from east to west in the direction pointed by the tool.
Using the Solar Visualizer Tool
Before you begin, use a compass or local map to find the east and west compass points. At each point, note the location of a distant object such as a tree or power pole. If you can't see far away, place a rock or other marker at the east and west compass points relative to where you will be standing. Sunrise Solar Position
While holding the tool at arm's length and at eye
level, align the center to the eastern compass
point. Turn the tool until the SUNRISE line is level with the
ground. If you can see the eastern horizon, the SUNRISE line
should line up with the horizon. 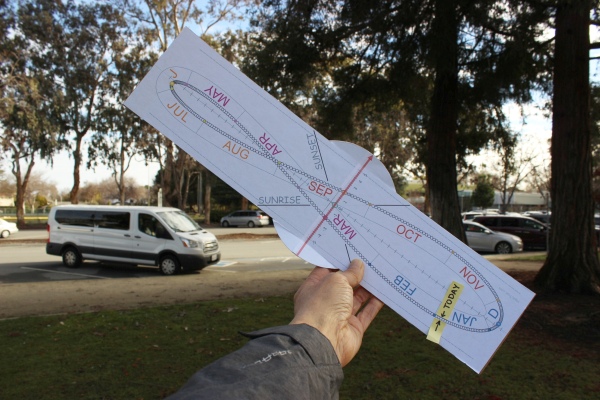
The center of the tool is now aligned to the all-year average position of the Sun at 6:00 AM. The analemma figure-8 loop shows you the exact position at 6:00 AM for each day of the year. This actual position is below the horizon in winter or above the horizon in summer.
If you're actually doing this at 6:00 AM (7:00 AM during Daylight Savings Time), the little circle in the analemma at today's date should coincide with the actual current Sun position.
Warning: To protect your eyes, never look at the Sun. Block direct sunlight using the tool or your hands.
Sunset Solar Position
Now turn around and face west. While holding the tool at arm's
length and at eye level, align the center to the
western compass point, and turn the tool until
the SUNSET line is level with the ground. 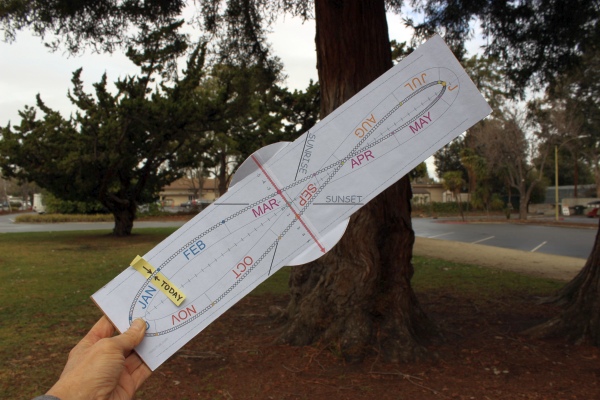
The center of the tool is now aligned to the average position of the Sun at 6:00 PM. The analemma shows the exact position of the Sun at 6:00 PM for each day of the year. Again, this is below the horizon in the winter or above it in summer.
If you're doing this at 6:00 PM (7:00 PM during Daylight Savings Time), the little circle at today's date should coincide with the actual Sun position.
Morning Solar Position
To find out where the Sun will be during the morning, go back
to the 6:00 AM eastern SUNRISE point and align the tool to the
horizon as before. The Sun moves in the direction of the red
arrow by one arrow-length (15 cm or 6 inches) per hour. To find the Sun's position at 7:00 AM, move the tool one full arrow-length. Keep the tool at arm's length, at a constant distance from your face.
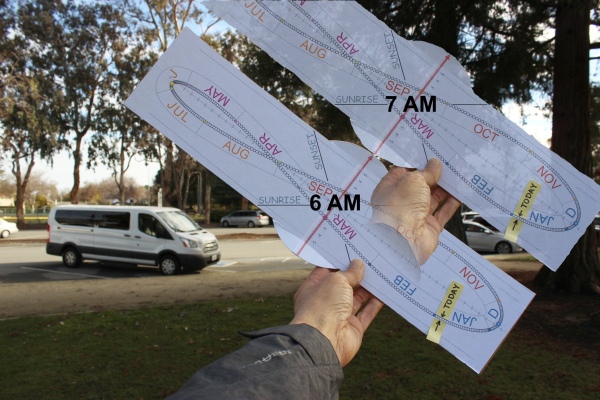
Repeat these motions to see the Sun's position at 8:00 AM, 9:00 AM, and so on. Turn your whole body as needed to follow the motion of the tool.
When you reach the actual current time of day, the little circle at today's date should coincide with the actual Sun in the sky.
Warning: To protect your eyes, never look at the Sun. Block direct sunlight from your eyes using the tool or your hands.If you do this at night, you'll see that the skinny end of the figure-8 analemma always points straight at Polaris, the North Star.
Noon Solar Position
At 12:00 noon, six arrow-lengths from the SUNRISE horizon, the Sun reaches its highest position in the sky, halfway between sunrise and sunset. At that point, the tool is directly south of you and positioned vertically, straight up from the southern horizon.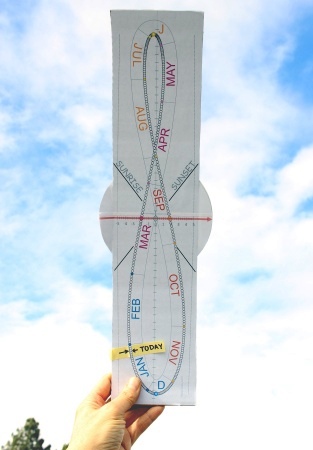
In the afternoon, you can work ether forward from noon or backward from the SUNSET horizon.
Afternoon and Evening Solar Position
To find the solar position late in the day, go back to the
6:00 PM western SUNSET point and align the tool to the horizon
as before. Move the tool forward in the arrow direction by one
arrow-length to see the solar position for 7:00 PM, then 8:00
PM, and so on; or backward by one arrow-length for 5:00 PM,
then 4:00 PM, and so on. 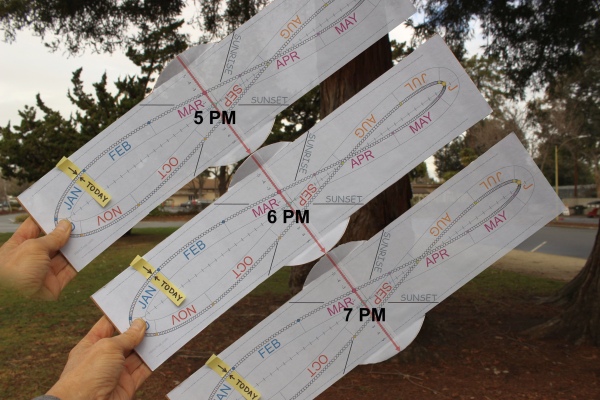
Note: The SUNSET alignment to the horizon corresponds to 6 PM standard time or 7 PM Daylight Savings Time.
Tilt of the Tool Relative to the Horizon
The path of the red arrow through the sky is called the celestial equator, an imaginary line running from the eastern to the western compass point, tilted away from vertical by an angle equal to your latitude. The HelioTrak sundial shows this clearly.For the house in the middle, the edge of the green circular plate is the horizon. The blue cage shows the path of the analemma as you move it through the sky from east to west. The cage's central circular path is the celestial equator. From the house, the horizon and celestial equator both appear as straight lines.
The tilt of the celestial equator depends on your latitude. You need to customize the tilt of the SUNRISE and SUNSET lines of the tool for your latitude, as described below.
How to Make the Solar Visualizer Tool
The HelioTrak solar position visualizer tool is free to print
out for personal or educational use. These are the steps to
make the tool. - Open the
solar visualizer SVG file in a browser window.
- Using your browser's File > Print command, print out
the diagram at 100% full size, which requires 2 pages. Use
a color printer if available; otherwise, black-and-white
is fine.
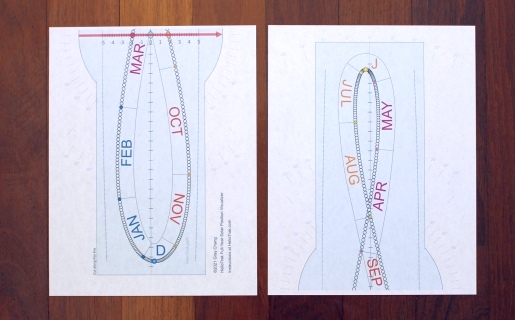
Some web browsers have trouble printing out the file at full size. My FireFox browser wouldn't print the second page, but Chrome worked fine. Set the printer margins to the minimum allowed, or manually set the margins to 0.0 of the left and right and 0.2 inches or 5 mm at the top and bottom.
To check the printout for proper scale, verify that the distance between axis tick marks is 1.0 cm.

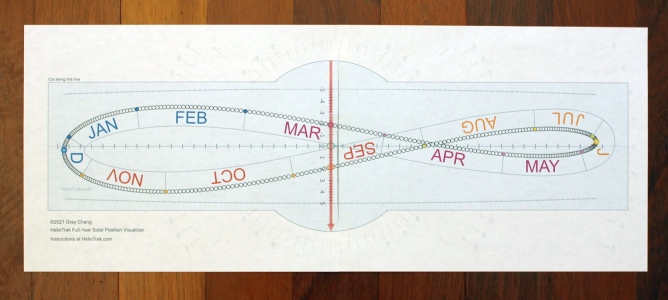
- Trim off the margins from the ends of the sheets and tape
them together to make a single long sheet.
- Find the latitude of your location in degrees north or
south by looking on a world map or by asking your smart
device.
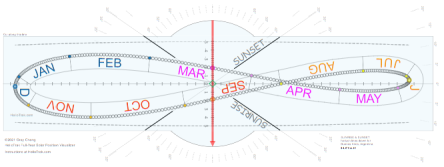
- Using a marker pen, draw two sets of diagonal lines,
each slanted away from the long axis by an angle equal to
your latitude. Use the faint 5-degree incremental markers
as guides. The lines should form an "X" shape extending to
the edges of the tool, as shown in the following latitude
examples.
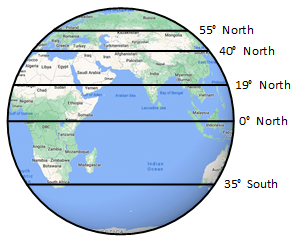
55° North -- Moscow, Copenhagen, Edinburgh:
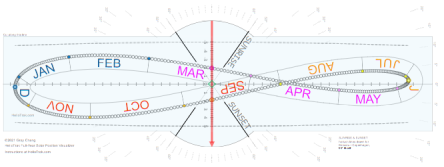
40° North -- Beijing, Madrid, New York City:
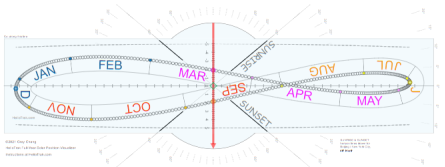
19° North -- Mumbai, Mexico City:
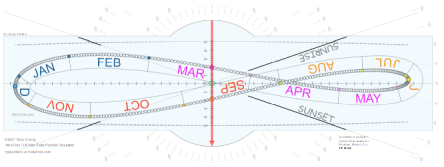
0° North -- Equator, Kampala, Galapagos Islands:
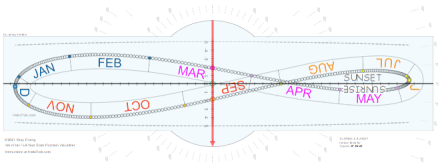
35° South -- Buenos Aires:
San Francisco Bay Area, 37.5° North
- Write the words SUNRISE and SUNSET as shown in the
example closest to your actual latitude. (The label positions and orientations are
different for north vs. south latitudes).
- Cut out the tool shape.
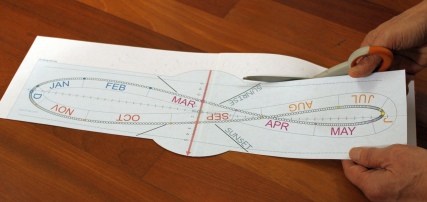
- Glue or tape the tool shape to a piece of cardboard
measuring 11.3 by 51.2 cm (4-1/2 by 20 inches). Glue stick
works well for this.

Your solar visualizer tool is now ready to use!
Back to Using the Solar Visualizer Tool
Additional Notes
- The tool is designed to be held at arm's length, 57 cm
(22 inches) from your face. If your reach is longer than
this, hold the tool a little closer. If your reach is
shorter, print out the tool at a proportionally smaller
scale, such as 90% for a 20-inch reach.
- You can print out the tool at 50% scale to fit it on one
sheet of paper. This is more convenient to carry around,
but you need to hold it 29 cm (11 inches) from your face
and keep it at that distance as you move the tool.
Half-size (11-inch)
analemma in Microsoft Word format
- Using a flat cardboard sheet is fine for practical
purposes. However, for scientific accuracy, use a curved
sheet of cardboard with an arch of 5 cm (2 inches) at the
center. This keeps the whole tool a constant 57 cm from
your face.
- On the Equator, the long central axis serves as both the
SUNRISE and SUNSET horizon. You align the tool
horizontally to the eastern horizon, move it straight up
until it's directly above you, and then straight down to
the western horizon.
- In the Southern Hemisphere, you move the tool through an arc
that's tilted toward the north instead of the south. At
noon, the tool points straight down (skinny end of the
figure-8 down) toward the northern
horizon.
- The marks on the two axes are spaced at intervals of 1
degree. On the short axis, the smaller tick marks are 1/4
degree apart, each representing 1 minute of solar motion
in the direction of the red arrow.
- The little circles in the analemma are slightly smaller
than the actual disk of the sun. The tool shows circles of
actual solar disk size at the two solstices, at the ends of
the analemma.
- The HelioTrak sundial
and HelioTrak solar position visualizer are two different
versions of the same tool. With the sundial, you are
outside of the sky looking in, whereas with the cardboard
analemma tool, you are inside of the sky looking out.
That's why the analemmas of the two tools are mirror
images of each other, and also why celestial globes show
constellations as mirror images.
- Cram's Imperial world globe has an Equation of Time analemma printed in the Pacific Ocean, but it is flipped backward, showing the inside-looking-out version of the analemma, when it ought to show the opposite. If a ship in the Pacific were to sail to a position where the Sun is directly overhead at exactly noon each day, it would trace out a sailing path that is a mirror image of Cram's analemma.
- The analemma printout is 100% accurate for the year
2022, but in other years, the dates are off by a partial
day because of leap years and the annual quarter-day
shift relative to the seasons. There are long-term shifts as well, so have your
great-great grandchildren make updated tools.
Exact Solar Time Within Time Zone
The solar position visualizer tool accurately predicts the solar position for a given local solar time, such as 6:00 AM. Solar time is the same as the clock time if you are located at the reference meridian of your time zone.For example, US Eastern Standard Time is based on the 75th west meridian. New York City is very close to this meridian, so clock time and solar time are nearly the same. But Detroit, in the same time zone, is located 8 degrees west of the meridian.

When sunrise occurs in New York City, the Sun is still below the horizon in Detroit, even though both cities use the same clock. To correct for this difference in Detroit, move the tool backward by 8 degrees or 8 cm (half the red arrow length), OR equivalently, subtract 32 minutes from Eastern Standard Time to get local Detroit solar time.
Analemma Figure-8 Shape
The Wikipedia article Equation of Time explains the figure-8 shape of the analemma. The shape is a combination of two effects:- tilt of Earth's axis = tilt of ecliptic
- Earth's asymmetrical elliptical orbit, with the Sun at one focus of the ellipse
Look at the ecliptic on a celestial globe. At each solstice, the Sun moving along the ecliptic crosses the lines of longitude relatively quickly, as these lines come closer together nearer to the poles, and the Sun moves across them perpendicularly.
Conversely, at each equinox, the lines of longitude are maximally spread out, and the Sun crosses them at an angle, further slowing the change in solar longitude. The longitude of the Sun on the celestial globe determines whether it is ahead or behind of the average solar position along the celestial equator. The latter is what we use to set our clocks.
The asymmetrical elliptical orbit of the Earth causes the Sun to race slightly ahead of average in January (perihelion) and fall slightly behind average in July (aphelion). That's what gives the analemma its slight tilt, and makes it skinny in the summer and wide in the winter. If perihelion coincided exactly with the December solstice, there would be no tilt, but there would still be skinny and wide parts.
The cardboard analemma is an X-Y plot of the Equation of Time, where X is the time value and Y is the solar declination (number of degrees north of the celestial equator), with a slight adjustment of X coordinates for the convergence of the lines of longitude. You can see the plus and minus 5-degree lines of longitude drawn on the analemma. The green diamond at the center of the analemma represents the average position of the Sun for the whole year.

